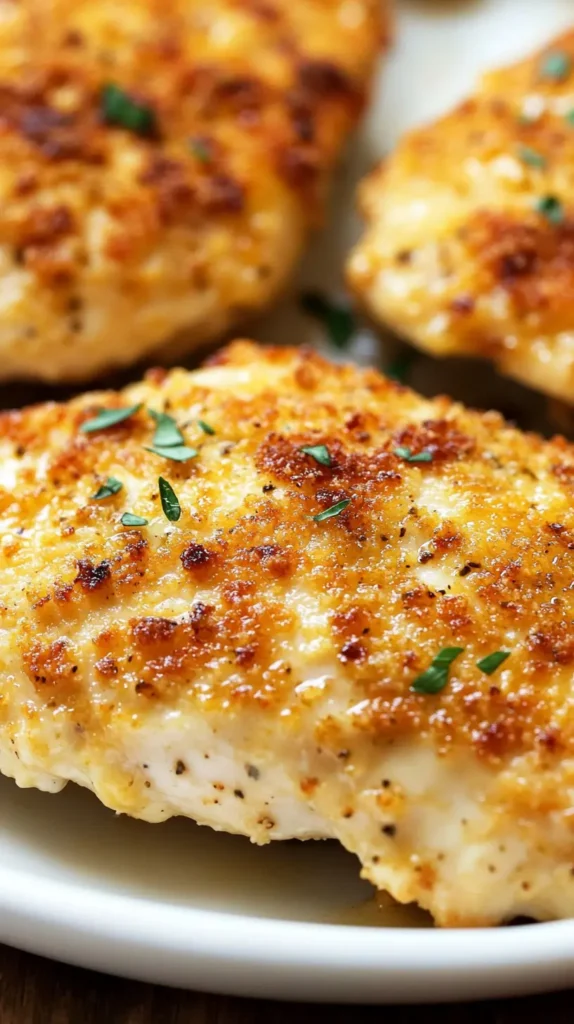
There is a reason this melt in your mouth chicken breast has been on my dinner table for years.
It is the kind of recipe that sounds almost too simple to be true — five ingredients, five minutes of prep, and you end up with the most tender, juicy baked chicken breast you have ever tasted.
Looking for more easy chicken dinners? Check out all our [easy chicken recipes] for weeknight inspiration.
The mayonnaise and parmesan coating creates a golden crust on top while keeping every single bite moist and flavorful inside.
If you have ever pulled dry, rubbery chicken breast out of the oven and sworn off baking chicken forever, this recipe is going to change your mind completely.
Prep time: 5 minutes Cook time: 30 minutes Total time: 35 minutes Servings: 4 Calories: ~320 per serving
nutrition values calculated using USDA FoodData Central
Why This Recipe Actually Works (The Science Behind It)
Before we get into the ingredients and steps, I want to explain why this melt in your mouth chicken breast recipe is different from every other baked chicken recipe you have tried.
The secret is the mayonnaise coating.
Mayonnaise is made from oil and egg yolks — two things that are incredible at retaining moisture during cooking.
When you spread a layer of mayo over raw chicken breast and put it in the oven, the fat creates a physical barrier that traps the natural juices inside the meat. The chicken essentially braises in its own moisture while the outside gets golden and crispy from the parmesan cheese.
Compare this to the typical baked chicken breast recipe: you season the chicken, put it in the oven, and within 25 minutes the moisture has evaporated and you are left with dry meat. With the mayonnaise parmesan coating, that cannot happen. The moisture has nowhere to go.
This is also why so many people call it “melt in your mouth” chicken — because the texture is genuinely that tender. When you cut into it, the chicken practically falls apart.
Ingredients for Mayonnaise Parmesan Chicken Breast
You only need five ingredients for this baked chicken breast with mayo and parmesan. Nothing fancy, nothing that requires a special trip to the store.
For the chicken:
- 4 boneless, skinless chicken breasts (medium thickness, around 6–7 oz each)
- ½ cup mayonnaise (full-fat works best — do not use light mayo)
- ¾ cup freshly grated parmesan cheese, divided
- 1 teaspoon garlic powder
- ½ teaspoon seasoned salt
- ¼ teaspoon black pepper
Optional add-ins to customize:
- ½ teaspoon smoked paprika (adds a warm, smoky depth)
- ¼ teaspoon cayenne pepper (for a subtle kick)
- 1 teaspoon Italian seasoning (for a herb-forward version)
- ½ teaspoon onion powder
Ingredient Notes and Substitutions
Mayonnaise: Full-fat mayonnaise is the best choice for this recipe. The higher fat content means more moisture retention and better browning.
If you prefer, you can substitute with sour cream or plain Greek yogurt —If you enjoy lighter chicken recipes, you might also love our [honey garlic chicken] which uses a similar easy coating technique.
both work well and give slightly different flavor profiles. Sour cream gives a slightly tangier result, while Greek yogurt makes it a touch lighter.
Parmesan cheese: Freshly grated parmesan from a block makes a noticeable difference compared to the pre-shredded kind. Pre-shredded parmesan contains anti-caking agents that prevent it from melting properly. If parmesan is not available, Asiago, Gruyere, or Extra Sharp Cheddar all work as substitutes.
Chicken breasts: Medium-thickness chicken breasts work best for even cooking. If your chicken breasts are very thick (over 1 inch), consider butterflying them or pounding them to an even thickness. This ensures the inside cooks through before the outside gets overdone.
How to Make Melt in Your Mouth Chicken Breast

This mayonnaise parmesan chicken recipe comes together in three simple steps. Even if you have never cooked chicken before, you can absolutely nail this.
Step 1 — Preheat and Prepare
Preheat your oven to 375°F (190°C). Lightly grease a 9×13 inch baking dish with cooking spray or a thin layer of olive oil. Set it aside.
If your chicken breasts are uneven in thickness, place them between two sheets of plastic wrap and use a meat mallet or rolling pin to pound them to an even thickness — about ¾ inch works perfectly.
Step 2 — Make the Mayonnaise Parmesan Coating
In a medium bowl, combine the mayonnaise, ½ cup of the parmesan cheese, garlic powder, seasoned salt, and black pepper. Stir everything together until you have a thick, uniform paste. Taste it — this is your chance to adjust seasoning before it goes on the chicken.
[PHOTO: Mixing bowl with creamy mayo parmesan mixture]
Step 3 — Coat and Bake
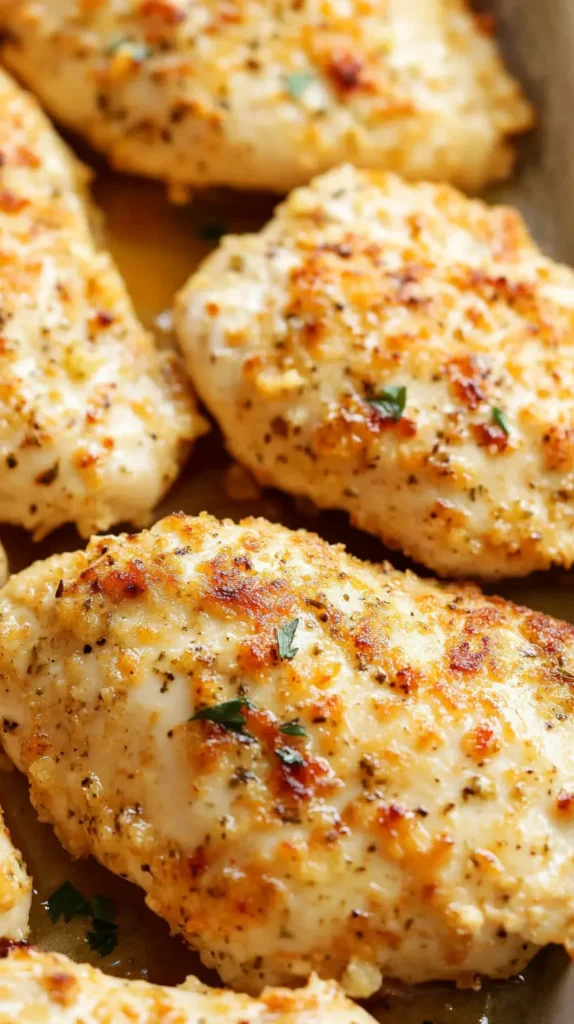
Arrange the chicken breasts in a single layer in your prepared baking dish. They should not overlap or touch each other. Using a spoon or spatula, spread the mayonnaise parmesan mixture generously over the top of each chicken breast. Cover the entire surface, right to the edges.
Sprinkle the remaining ¼ cup of parmesan cheese over the top for extra browning.
Place the baking dish in the preheated oven and bake for 25–30 minutes. The chicken is done when:
- The internal temperature reaches 165°F (use a meat thermometer inserted into the thickest part)
- The juices run clear when you pierce the chicken with a knife
- The parmesan coating is golden and slightly bubbly
Step 4 — Broil for the Golden Crust (Optional but Recommended)
After baking, switch your oven to broil on high. Place the baking dish under the broiler for 2–3 minutes, watching carefully the entire time. This step gives the mayonnaise parmesan coating that gorgeous golden-brown color and slightly crispy texture on top. Do not walk away — it goes from golden to burnt quickly under a broiler.
Step 5 — Rest and Serve
Remove the chicken from the oven and let it rest for 5 minutes before cutting. This is important — resting allows the juices to redistribute through the meat. If you cut into it immediately, all those juices will pour out onto the cutting board and you will be left with drier chicken.
Pro Tips for the Best Baked Chicken Breast with Mayo
The key to getting that melt in your mouth chicken breast texture is the resting time…
Use room temperature chicken. Cold chicken straight from the fridge takes longer to cook and tends to cook unevenly. Take your chicken out of the refrigerator 15–20 minutes before you plan to cook it.
Do not skip the broil. Baking alone gives you juicy chicken, but the broil step gives you that restaurant-quality golden crust on top. It only takes 2–3 minutes but completely transforms the presentation.
Invest in a meat thermometer. Baking time varies depending on the exact thickness of your chicken breasts. A meat thermometer takes all the guesswork out of it. 165°F is your target — not 160°F, not 170°F. Right at 165°F gives you perfectly cooked chicken every time.
Do not overcrowd the pan. If your chicken breasts are touching in the pan, they will steam instead of bake. Steam means no browning, which means no golden crust. Use a large enough baking dish so there is space between each piece.
Make the coating generous. This is not the time to be conservative. Spread the mayonnaise parmesan mixture thick and all the way to the edges of each chicken breast. Any part you miss will dry out during baking.
What to Serve with Melt in Your Mouth Chicken Breast
This baked chicken breast with mayonnaise and parmesan goes with almost anything. Here are some of my favorite combinations:
For a quick weeknight dinner:
- Roasted broccoli or asparagus (toss with olive oil and roast in the same oven at 375°F)
- Simple white or brown rice
- Garlic butter noodles
- Steamed green beans with lemon
For a more elevated dinner:
- Creamy mashed potatoes
Or if you love bold garlic flavor, our [cheesy garlic chicken wraps] are the perfect companion dish for meal planning. - Roasted garlic parmesan potatoes
- A fresh green salad with lemon vinaigrette
- Crusty bread to soak up the pan juices
For meal prep bowls:
- Slice the chicken and serve over quinoa with roasted vegetables
- Add to a Caesar salad for a high-protein lunch
- Shred and use in wraps or sandwiches the next day
How to Store and Reheat Leftovers
Refrigerator: Let the chicken cool completely before storing. Place in an airtight container and refrigerate for up to 3 days. The chicken holds up well in the fridge and actually tastes great cold, sliced over a salad.
Reheating: The best way to reheat this melt in your mouth chicken breast is in the oven. Preheat to 325°F, place the chicken in a covered baking dish (cover with foil to prevent the top from over-browning), and warm for 10–15 minutes until heated through. The microwave works in a pinch — use 50% power and heat in 30-second increments.
Freezing: Freezing is not recommended for this recipe. Mayonnaise-based sauces and coatings do not freeze well — the texture becomes grainy and separated after thawing. This is a recipe best enjoyed fresh or within the 3-day refrigerator window.
Variations on This Mayonnaise Chicken Breast Recipe
One of the reasons this recipe has stayed in my rotation for so long is how easy it is to adapt. Here are some variations worth trying:
Spicy Mayo Chicken: Add 1 tablespoon of sriracha and ¼ teaspoon cayenne pepper to the mayo mixture. The heat balances beautifully with the richness of the parmesan.
Italian Herb Version: Mix in 1 teaspoon of Italian seasoning and add a handful of sun-dried tomatoes on top before baking. Serve with pasta.
Or serve it alongside our [garlic parmesan chicken pasta] for a full Italian-inspired dinner.
Dijon Parmesan Chicken: Replace 2 tablespoons of the mayo with Dijon mustard. The mustard adds a subtle sharpness that cuts through the richness.
Cheddar Ranch Version: Replace the parmesan with sharp cheddar and add 1 teaspoon of ranch seasoning powder to the coating. Kids absolutely love this version.
Low-Calorie Version: Use Greek yogurt instead of mayo and reduce the parmesan to ½ cup. You get the same creamy coating with significantly fewer calories.
Common Questions About Melt in Your Mouth Chicken
Does the chicken actually taste like mayonnaise?
No. This is the most common concern people have before trying this recipe, and it always surprises them. The mayonnaise essentially melts into the coating during baking. What you taste is incredibly juicy, savory chicken with a golden parmesan crust — not mayo. Think of the mayo as a cooking tool, not a flavoring agent.
Can I use chicken thighs instead of chicken breasts?
Absolutely. Bone-in, skin-on chicken thighs work beautifully with this coating. They are naturally higher in fat, so they are even harder to dry out. Increase the baking time to 40–45 minutes and check for an internal temperature of 165°F.
What kind of mayonnaise is best for baked chicken breast?
Full-fat regular mayonnaise works best. Brands like Hellmann’s or Duke’s give consistently good results. Light or reduced-fat mayonnaise has a higher water content, which can make the coating runny and reduce browning. Japanese Kewpie mayo is an excellent upgrade if you have access to it — it makes the coating even creamier.
Why is there liquid in the bottom of my pan?
Chicken releases natural juices as it cooks, and in a baking dish those juices collect at the bottom. This is completely normal and not a problem. If you plan to broil the chicken at the end, drain off most of the liquid first — it will splatter under the broiler otherwise. The juices in the pan are excellent for spooning over rice or pasta.
Can I make this recipe ahead of time?
Yes — this is one of the best things about this melt in your mouth chicken breast recipe. Prepare everything up to and including spreading the coating on the chicken, then cover the baking dish tightly with plastic wrap and refrigerate for up to 24 hours. When you are ready to cook, remove the dish from the fridge 15 minutes before baking and cook as directed. The flavors actually develop even more when it sits overnight.
How do I know when my chicken breast is done without a thermometer?
Pierce the thickest part of the chicken with a sharp knife or skewer. If the juices that run out are completely clear with no pink tinge, the chicken is done.
USDA recommends 165°F as the safe internal temperature for chicken
If you see pink or cloudy juices, give it another 5 minutes and check again. That said, a meat thermometer is a worthwhile investment for cooking chicken consistently — they cost less than $15 and eliminate all guesswork.
Can I use frozen chicken breasts?
You can, but you need to thaw them completely first. Never bake chicken breast from frozen — the outside will overcook before the inside reaches a safe temperature. Thaw frozen chicken overnight in the refrigerator or use the cold water method (submerge the sealed bag in cold water, changing the water every 30 minutes — typically takes 1–2 hours for chicken breasts).
Print
Melt In Your Mouth Chicken Breast
This Melt in Your Mouth Chicken recipe is a creamy, juicy, and low-carb baked dinner made with mayonnaise, Parmesan, and garlic — ready in under an hour! With only a handful of ingredients and no-fail instructions, it’s perfect for beginners or busy weeknights. Try it now and turn your ordinary chicken into a mouthwatering masterpiece!
- Total Time: 35 minutes
- Yield: 4 chicken breast
Ingredients
-
4 boneless, skinless chicken breasts
-
1 cup mayonnaise (or plain Greek yogurt for lighter version)
-
½ cup grated Parmesan cheese
-
1 teaspoon garlic powder
-
1 teaspoon onion powder
-
1 teaspoon salt
-
½ teaspoon black pepper
-
Optional: ½ teaspoon paprika or Italian seasoning (for topping)
Instructions
-
Preheat oven to 375°F (190°C). Grease a 9×13-inch baking dish or line with parchment paper.
-
Pound chicken breasts to even thickness (about ¾ inch thick) for even cooking.
-
In a medium bowl, mix together the mayonnaise, Parmesan cheese, garlic powder, onion powder, salt, and pepper until smooth.
-
Spread the mixture evenly on top of each chicken breast, covering the entire surface.
-
Place in baking dish and sprinkle optional paprika or Italian seasoning on top.
-
Bake uncovered for 35–45 minutes, or until the chicken reaches an internal temperature of 165°F (74°C) and the top is golden.
-
Let rest for 5 minutes before serving for maximum juiciness.
Notes
Pro Tips & Notes
-
✅ Pounding the chicken is key to even cooking and tender texture.
-
✅ Use a meat thermometer for perfect doneness without drying out the chicken.
-
✅ For a crispy crust, broil for the last 2–3 minutes.
-
✅ Greek yogurt gives a tangy, lighter version — great for cutting fat.
- Prep Time: 5 minutes
- Cook Time: 30 minutes
- Category: Main Course
- Method: Baking
- Cuisine: American